Creating a Web Application
Generally, a web application starts with a login portal or registration
portal, otherwise we could use simple html pages for rest things out there. Our
first web application will be starting with a login portal, interacting with
database through a servlet with validation and login error handling .
Requirements :
- An IDE (most preferably
Eclipse J2EE)
- Server (Apache Tomcat) //
link to download is given in previous blog post.
- Database (most preferably
MySql 5.5)
Follow the steps below and code to create a login page :
1. Open Eclipse Enterprise edition. File
-> New -> Dynamic Web Project.

2. Enter project name and choose a new runtime which
is the server itself.

3. Select server name and specify it’s directory in
the system.

4. click next, and put build/classes as the output folder (by default it’s same written
here) and then next, check the web.xml
for deployment description purpose.

5. Click on Finish
to end setup.
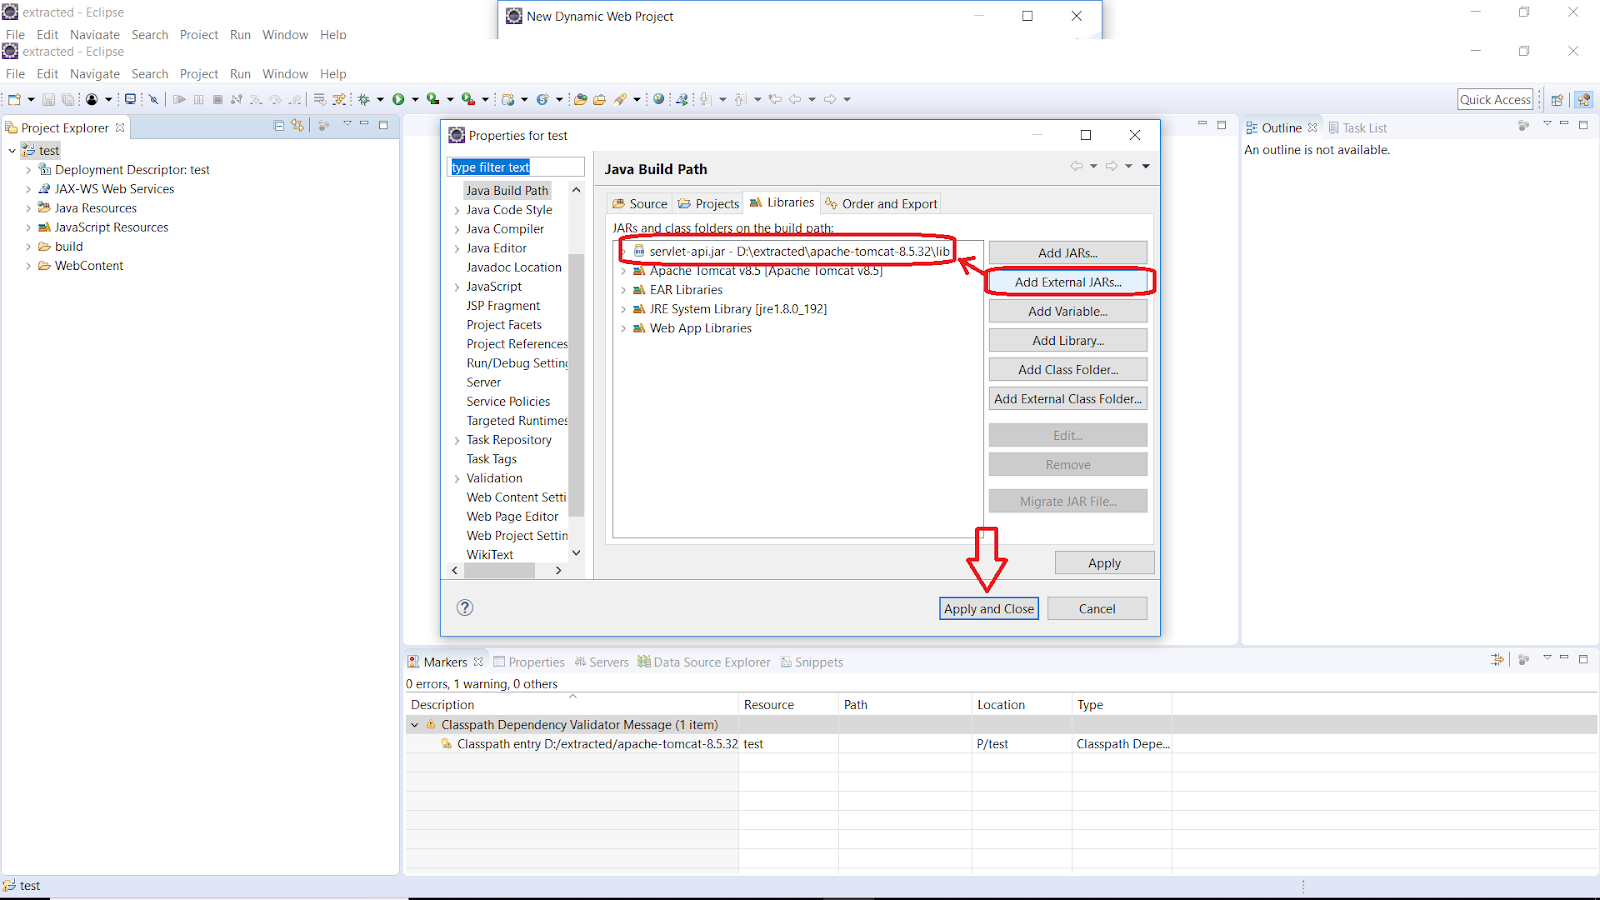
6. Right click on project name (test here), Build Path ->
Configure Build Path in order to configure project for servlet-api if not provided (to avoid compilation error in most
cases). A dialog box will open, click on
Add External JAR, go to apache tomcat->lib directory and select
servlet-api.jar, apply the change.
7. Click on project name, create a .jsp file named login.jsp as follows : WebContent->New->JSP File.

8. All we need now to write code for login.jsp, a
servlet and web xml, along with a login table in database.
login.jsp:
<%@ page language="java"
contentType="text/html; charset=ISO-8859-1"
pageEncoding="ISO-8859-1"%>
<!DOCTYPE html PUBLIC "-//W3C//DTD
HTML 4.01 Transitional//EN" "http://www.w3.org/TR/html4/loose.dtd">
<html>
<head>
<meta http-equiv="Content-Type"
content="text/html; charset=ISO-8859-1">
<title>login
page</title>
</head>
<body>
<form action="Login"
method="post">
username: <input type="text" name="email"
required><br>
password: <input type="password" name="pass"
required><br>
<input type="submit"
value="Login"> <input type="reset"
value="reset">
<center style="color: red">
<%
if (null != request.getAttribute("errorMessage")) {
String s = (String) request.getAttribute("errorMessage");
if (s != null) {
out.println(s);
}
}
%>
</center><br>
<center style="color: red">
<%
if (null != request.getAttribute("errorMessage")) {
String s = (String) request.getAttribute("errorMessage");
if (s != null) {
out.println(s);
}
}
%>
</center><br>
</form>
</body>
</html>
Action in form is “Login” which will be our servlet
named Login.java.
9. Create a login table in database (let uid(user,pass)
be the table.
Mysql:
· User
: root and pwd:4591
· Database
name: login
· Code:
create table uid ( user varchar(20),
pass varchar(20), primary key(user));
insert into uid() values(“a”,
“a”);
10. To create Servlet, goto project name->new->servlet. A dialog box will open, enter
package name (like com), it’s optional and class name as Login, to generate Login.class file (same as filename Login.java).
Click on next and notice the Url mapping
: /Login which will be used in web.xml for mapping purpose. Click next and
finish to open Login.java file.
Login.java
:
package com;
import java.io.IOException;
import java.io.PrintWriter;
import java.util.ArrayList;
import java.util.List;
import java.sql.Connection;
import java.sql.DriverManager;
import java.sql.ResultSet;
import java.sql.Statement;
import javax.servlet.RequestDispatcher;
import javax.servlet.ServletContext;
import javax.servlet.ServletException;
import javax.servlet.annotation.WebServlet;
import javax.servlet.http.Cookie;
import javax.servlet.http.HttpServlet;
import
javax.servlet.http.HttpServletRequest;
import
javax.servlet.http.HttpServletResponse;
import javax.servlet.http.HttpSession;
import javax.servlet.http.HttpSessionActivationListener;
//import
com.sun.xml.internal.bind.v2.schemagen.xmlschema.List;
public class Login extends HttpServlet {
public void doGet(HttpServletRequest request, HttpServletResponse response) throws ServletException, IOException {
RequestDispatcher dispatcher = request.getRequestDispatcher("/Login.jsp");
dispatcher.forward(request, response);
}
public void doPost(HttpServletRequest request, HttpServletResponse response) throws ServletException, IOException {
try {
String user = request.getParameter("email");
String pass = request.getParameter("pass");
int c = 0;
// jdbc call
Class.forName("com.mysql.jdbc.Driver");
Connection con = DriverManager.getConnection("jdbc:mysql://localhost:3306/login?useSSL=false", "root", "4591");
System.out.println("Connected to mysql");
Statement st = con.createStatement();
ResultSet rs = st.executeQuery("select * from
uid");
while (rs.next()) {
if (user.equals(rs.getString("user")) && pass.equals(rs.getString("pass"))) {
response.sendRedirect("https://icodemac55.blogspot.com");
c++;
}
}
if (c == 0) {
request.setAttribute("errorMessage", "Invalid username or password");
RequestDispatcher dispatcher = request.getRequestDispatcher("/Login.jsp");
dispatcher.forward(request, response);
response.sendRedirect("Login.jsp");
}
} catch (Exception e) {
e.printStackTrace();
}
}
}
11. Last step is to write code for web.xml file
which lie inside WebContent-> WEB-INF
-> lib.
web.xml:
<?xml version="1.0"
encoding="UTF-8"?>
<web-app xmlns:xsi="http://www.w3.org/2001/XMLSchema-instance"
xmlns="http://xmlns.jcp.org/xml/ns/javaee"
xsi:schemaLocation="http://xmlns.jcp.org/xml/ns/javaee
http://xmlns.jcp.org/xml/ns/javaee/web-app_3_1.xsd" id="WebApp_ID" version="3.1">
<display-name>log</display-name>
<servlet>
<servlet-name>Logintesteeeee</servlet-name>
<servlet-class>com.Login</servlet-class>
</servlet>
<servlet-mapping>
<servlet-name>Logintesteeeee</servlet-name>
<url-pattern>/Login</url-pattern>
</servlet-mapping>
<welcome-file-list>
<welcome-file>login.jsp</welcome-file>
</welcome-file-list>
</web-app>
12. Run the project on server project-name(test)-> Run as -> Run on Server.

(if error occurred on http://localhost:8080/test, then run
login.jsp as: http://localhost:8080/test/login.jsp).
If login credentials are correct, you’ll redirected to
the required page, else an error will be thrown on same page.
Note: For
user friendly view, choose in Eclipse EE ide (Window- Show View- Navigator).

Comments
Post a Comment